How to Make a Buttonhole on a Brother Sewing Machine
Step-by-step guide to creating precise buttonholes on a Brother sewing machine. Learn essential tools, model settings, marking techniques, and pro tips for beginners to achieve professional results.

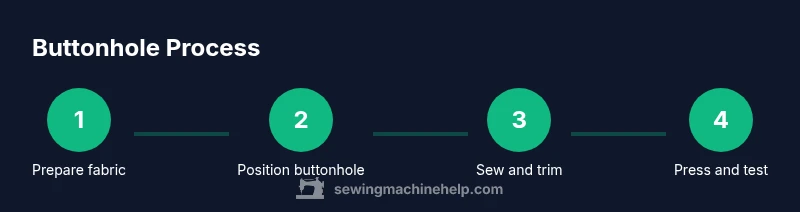
To make a buttonhole on a Brother sewing machine, attach the Buttonhole foot, choose the Buttonhole stitch, and set an appropriate length and width. Mark the hole location, sew the start and end stitches, trim and press the opening. Always test on scrap fabric first to dial in size and stitch density.
Why this matters for home sewers
If you’ve ever wondered how do you make a buttonhole on a Brother sewing machine, this guide breaks down the process into practical steps you can follow at home. Buttonholes are a common finishing touch on garments, bags, and cushions, and getting them right saves time and reduces waste. On many Brother models, the built-in buttonhole option works with a dedicated Buttonhole Foot and a simple set of settings. The key is consistency: a centered hole, the exact size needed for your button, and a neat edge that won’t fray after washing. By understanding fabric weight, needle choice, and foot alignment, you can transform a basic project into something that looks professionally finished. Sewing success is less about raw power and more about careful preparation, precise markings, and using the right presser foot. Sewing Machine Help’s guidance highlights these elements so you can build confidence with every project.
Understanding your Brother model and settings
Brother sewing machines vary by model, but most share a common workflow for buttonholes. Start by locating the built‑in buttonhole function, which is typically accessed via a dedicated stitch selector or screen menu. Some machines offer a one‑step buttonhole that automatically stitches the entire hole; others require you to sew the end stitches and then complete a bar in the middle. Regardless of model, key settings affect the final result: stitch type (Buttonhole), stitch length (controls the vertical size), and stitch density (affects how tight the border sits against the fabric). If your machine provides a size guide or adjustable width, set it to match your button’s diameter and the fabric’s weight. Always consult your manual for model-specific details, but the general approach remains consistent: test, adjust, and sew with control rather than speed.
Tools and materials you’ll need
Before you start, gather a few essential items to ensure a clean, accurate buttonhole. The Brother Buttonhole Foot (correct model) is the most important tool, because it aligns the stitch with a built‑in guide. A woven fabric scrap is ideal for testing, along with marking tools (chalk, erasable pens, or a fabric marker) to place the hole accurately. Have sharp scissors or a seam ripper handy to trim the opening, a ruler or measuring tape for precise sizing, and an iron with a pressing surface to flatten seams after sewing. Optional but helpful: thread snips, extra bobbins wound with the same thread, and a walking foot for slippery fabrics. These items help reduce shifting and improve alignment throughout the process.
Marking and fabric prep for accurate results
Accurate alignment starts with precise marking. Lay your fabric flat and measure the buttonhole length based on the button’s diameter plus a small clearance (about 1–2 mm is typical for many fabrics). Use a marking tool to place the start and end points, then double‑check symmetry by folding the fabric and comparing the margins on both sides. If you’re sewing multiple buttonholes on a garment, create a small template or use a marking gauge to ensure consistent spacing between holes. For delicate or stretch fabrics, stabilize the area with a light fusible interlining or a scrap of woven fabric behind the area to minimize distortion during stitching. The goal is a clean, evenly spaced opening that matches the button and the garment’s design.
Step-by-step: common approach to buttonholes on a Brother machine
This section provides a high-level roadmap you can follow while you read the detailed steps. Start by mounting the Buttonhole Foot and selecting the Buttonhole stitch. Set the length and width to suit your fabric weight. Mark the placement, align the fabric under the foot, and begin stitching the two end stitches first. Then sew the central bar, finish with any required reinforcement stitches, trim the opening, and press flat. Finally, test the buttonhole with the actual button to verify fit and edge quality. Practicing on a scrap garment slabs helps build muscle memory and reduces surprises when you switch to the final item.
Troubleshooting common issues and tweaks
Even with careful preparation, issues can arise. If the buttonhole looks too tight or the fabric bunches, recheck the stitch length and feed rate, and ensure the fabric beneath the foot is flat and taut. For heavy fabrics, you may need a slightly longer length or a wider hole; for lightweight fabrics, reduce length and avoid overfilling to prevent fraying. If the sides of the hole aren’t aligned, verify your marking accuracy and the placement of the fabric under the foot. Inconsistent results are often caused by shifting fabric, a dull blade in the cutting step, or incorrect tension on the top thread. Practice on a scrap first to adjust settings before final sewing.
Pro tips for precision and best results
Pro tip: Always test on a fabric scrap that matches your project in weight and weave before committing to the final piece. Use fabric markers that erase cleanly and avoid permanent marks on delicate fabrics. If your machine offers a memory setting for buttonhole length, save your favorite sizes for different button diameters. After sewing, trim the opening carefully with small scissors and press the seam flat with a hot iron. A crisp edge yields a more professional appearance and reduces wear over time.
Tools & Materials
- Brother Buttonhole Foot (model-compatible)(Ensure it’s the foot with the built‑in hole guide for your machine.)
- Fabric scrap (woven)(Use cotton or muslin to test size and density.)
- Marking tools (chalk/pencil/erasable pen)(For accurate hole placement without staining fabric.)
- Ruler or measuring tape(Mark precise hole length and spacing.)
- Sharp scissors or small seam ripper(Trim opening cleanly without fraying.)
- Iron and ironing board(Press opening for a crisp finish.)
- Extra bobbins and thread(Matches project thread for clean look.)
- Fabric stabilizer (optional)(Helpful for slippery or stretch fabrics.)
Steps
Estimated time: Estimated total time: 25-40 minutes depending on fabric and machine model
- 1
Prepare fabric and determine size
Measure your button diameter and mark the hole length with a slight clearance. Align your fabric so the grain runs straight and the area to be cut is flat. Confirm the available space around the buttonhole for seam allowances.
Tip: Use a scrap fabric identical to the final project for sizing accuracy. - 2
Attach Buttonhole Foot and test
Mount the Buttonhole Foot on the machine and perform a quick test stitch on a scrap. Check that the stitch line aligns with the edge of the test opening. Adjust the needle position if needed.
Tip: Test on scrap to confirm exact hole length before sewing the final piece. - 3
Mark placement on the actual fabric
Mark the exact start and end points for the buttonhole on your fabric using your marking tool. Double-check symmetry by measuring from opposite edges. Ensure the location aligns with the button on the finished garment.
Tip: Use a clear mark that washes away or fades after stitching. - 4
Set stitch length and width
Choose Buttonhole stitch, set the length to fit your fabric weight, and adjust any width setting so the hole accommodates the button with a clean border. If your model uses a separate width or density control, set it conservatively first.
Tip: For light fabrics, shorten length slightly to prevent a oversized hole. - 5
Position fabric and sew start/end stitches
Place the fabric under the foot with the marked start point aligned. Start sewing and allow the machine to complete the end stitches before stopping. Stop at the point where the needle would exit the seam area.
Tip: Maintain even fabric tension and avoid pulling to prevent distortion. - 6
Sew the middle bar and finish
Sew the central bar (the horizontal stitch across the opening) as directed by your model. Complete any reinforcement stitches if your manual suggests. Stop when the machine finishes the hole’s edge and the fabric sits flat.
Tip: Do not rush—controlled speed yields cleaner edges. - 7
Open and trim the opening
Carefully cut along the center of the opening to release the fabric without nicking the stitches. Trim thread tails close to the edge and remove any loose threads. Press the opening from the inside to flatten the border.
Tip: Use a seam ripper tip for precise, shallow cuts close to the stitched edge. - 8
Test fit and finalize
Insert the button to test fit and ensure the hole size matches. If needed, re-tighten or adjust length and rerun on a scrap first. Press the final buttonhole to set the edges.
Tip: Always test with the intended button on the final fabric.
Your Questions Answered
Do I need a special buttonhole fabric?
No special fabric is required, but stable woven fabrics yield the best results. Test on scrap to adjust for weight and stretch.
You don’t need special fabric—just start with a woven material and test first to dial in size and density.
Can I make decorative buttonholes or only standard ones?
Most Brother machines offer standard buttonhole options; some models include decorative variations depending on the model. Check your manual for available buttonhole styles.
Most Brother machines have standard buttonholes, with some models offering decorative options depending on the unit.
What if my buttonhole is too tight or too loose?
Adjust the stitch length and width, test on scrap, and verify the fabric is flat under the foot. Re-sew on scrap until the size matches your button.
If it’s tight or loose, tweak the length and width, test on scrap, and re-sew until it fits your button.
Should I service the machine after learning buttonholes?
No extra service is required beyond your normal cleaning and oiling schedule per the manual. Regular maintenance keeps stitches consistent.
No special service is needed beyond your usual maintenance routine.
How important is thread tension for buttonholes?
Tension affects stitch density and edge quality. Test with scrap and adjust both upper and bobbin tensions if the edge looks loose or overly tight.
Tension matters for density and edge quality; test and adjust as needed.
Can I use a buttonhole foot with other brands?
Buttonhole feet are often brand-specific. For best results, use the Brother Buttonhole Foot or a compatible version recommended for your machine.
Brand‑specific feet work best; check compatibility for any non-Brother feet.
Watch Video
The Essentials
- Choose the right Buttonhole Foot for your Brother model
- Test on scraps to dial in size and density
- Mark accurately and use a stable fabric base
- Sew start/end first, then the middle bar, then open and press